


تربية الأبناء معي

Why Hand-to-Hand Transfer Is an Underrated but Important Milestone
By around 20 weeks, your baby may be showing off some big moves like rolling over and even sitting up. But there’s another quiet milestone that deserves just as much celebration: hand-to-hand transfer. Around the 5-month mark, your baby starts to realize their hands are not just for waving in the air, they’re tools for action! One of the most telling signs is when they start passing a toy from one hand to the other. This simple act is a huge leap in motor development. Why Do Babies Start Transferring Objects Between Their Hands? This skill signals that your baby is developing coordination across the body’s midline. Crossing the midline is essential for tasks like self-feeding, dressing, and later, writing. Transferring objects helps both sides of the brain and body work together, a foundational step in physical and cognitive development. In photo: Hand to Hand Transfer Disc in the Bond With Me Play Box Early Signs of Hand-to-Hand Transfer in Infants: Bringing both hands together at the center of the body Reaching for toys using both hands Bringing objects to the mouth to explore them These movements typically emerge between 4 and 6 months as your baby’s hand-eye coordination and bilateral motor control improve. When Do Babies Begin Transferring Objects Between Hands? Most babies start experimenting with this skill around 5 months and refine it by 7 months. Girls often reach this milestone slightly earlier than boys.So, don’t worry if your baby is taking their time; every child progresses at their own pace. How This Milestone Supports Motor Development: Encourages coordination between both sides of the body Boosts spatial awareness and hand-eye coordination Builds the foundation for everyday actions like using utensils or getting dressed Promotes planning and purposeful movement Helpful Tools: Try Montessori-inspired toys like interlocking discs. Their shape and motion encourage wrist rotation and midline crossing. Plus, they double as teethers, making playtime both fun and functional. In photo: Hand to Hand Transfer Disc in the Bond With Me Play Box Hand-to-hand transfer may look small, but it plays a big role in preparing your baby for life’s next stages. Start the development journey with MonkiBox. Our Montessori-inspired toys are designed to give your child the best start.

Week 47: How to Help Your Child Learn to Walk
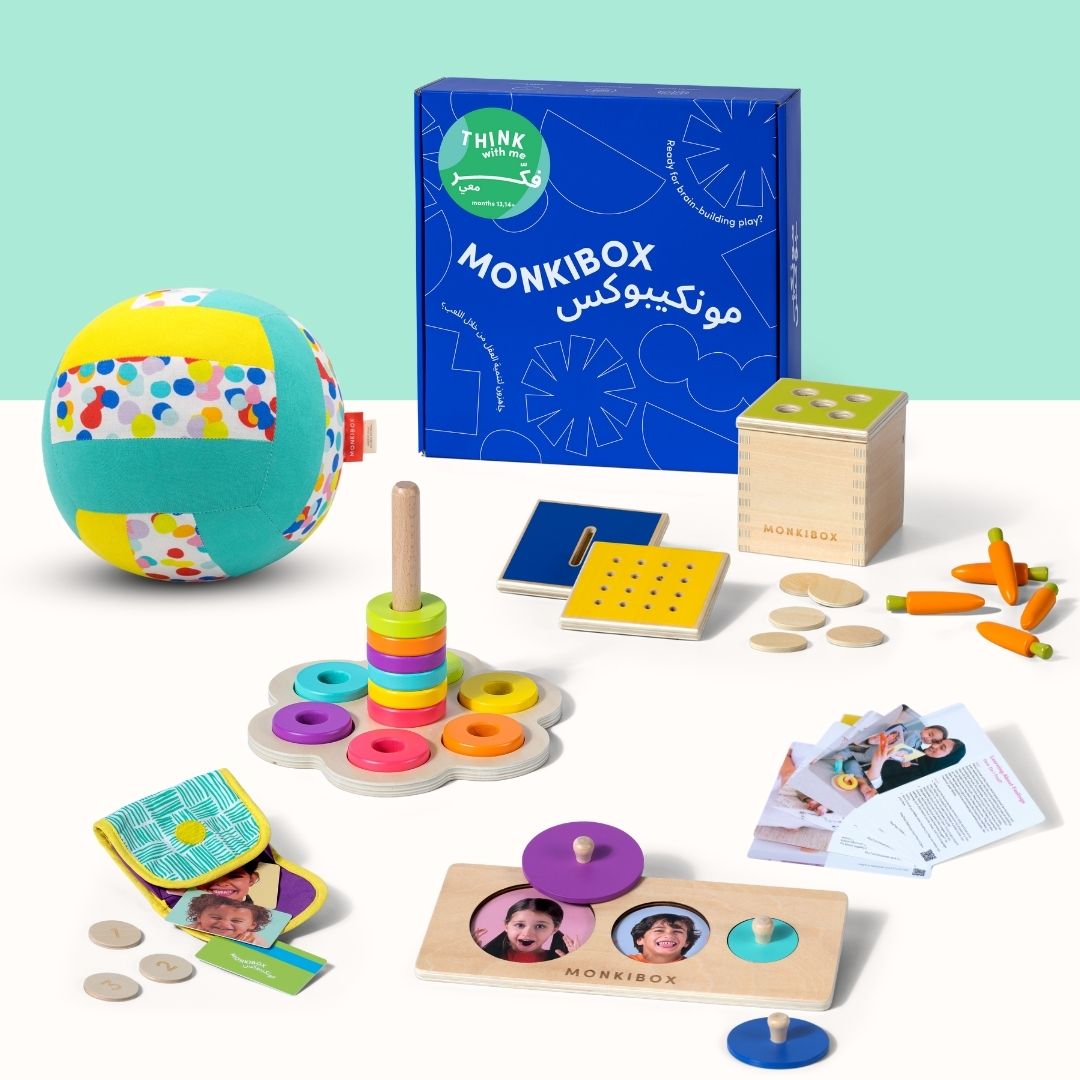
Ready? Set! Go! Your baby's first steps are one of the most anticipated milestones. Walking, first with support, then independently, is typically achieved between 9 and 18 months. While some babies walk earlier, others take a bit more time. That’s perfectly normal. If your child hasn’t started walking yet, here are ways to gently and effectively support their journey. In photo: Tissue Box in the Discover With Me Play Box Fun and Effective Ways to Encourage Walking: Cruising Practice: Arrange sturdy furniture in a line and encourage your baby to walk while holding onto it. Balance Activities: Tape colorful strips to the wall and invite your child to peel them off while standing. This encourages longer unsupported standing. Strength Training: Try games like squatting to pick up toys and tossing them into a basket. These motions build strong leg muscles. Push Play: Fill a basket with heavy toys or use a sturdy stroller that they can push around the house. Important Note on Baby Walkers: According to Harvard Medical School, baby walkers can delay the development of essential balance muscles and increase the risk of injury. Pediatricians recommend supervised floor time or stationary activity centers instead. Interactive Play Ideas: Sit opposite a family member and encourage your baby to walk back and forth between you. Make walking fun! Chase your baby on all fours, making playful sounds to build excitement and motivation. In photo: Soft Ball in the Think With Me Play Box Is Your Baby 1 Year Old and Still Not Walking? Don’t worry, just yet. While many babies walk around 12 months, it's completely normal to start as late as 15–18 months. Genetics, personality, premature birth, or physical conditions like low muscle tone can all play a role. When to Consult a Pediatrician: Not pulling up to stand by 12 months Not cruising by 15 months No attempt at independent steps by 18 months Natural Remedies and Supportive Strategies: Barefoot Time: Letting your baby walk barefoot strengthens foot muscles and enhances balance through better sensory feedback. Squat Games: Picking up objects from the floor builds leg strength. Push Toys: Weighted carts offer safe support for early walkers. Massage & Nutrition: Gentle leg and foot massages promote circulation. Ensure a diet rich in calcium, vitamin D, and protein to naturally support muscle and bone development. In photo: Flexible Stacker in the Think With Me Play Box Helping Your Baby Find Their Own Pace: Every baby develops differently. Learning to walk requires strength, coordination, and confidence. Avoid pressure, provide encouragement, and celebrate every small step. Before you know it, your little one will be running around! Start the development journey with MonkiBox. Our Montessori-inspired toys are thoughtfully designed to support every step of your baby’s growth.

Week 14: Reaching & Grasping — Why It’s Important and How to Encourage It
Your baby’s small movements lay the groundwork for bigger milestones. Motor development happens step by step, and two of the earliest and most essential skills are reaching and grasping, also known as prehension. Though babies are born with a palmar reflex (automatically closing their hand around anything that touches the palm), true voluntary reaching and grasping typically begin around 4 to 5 months. In photo: Rolling Bell in the Bond With Me Play Box Signs Your Baby Is Ready to Start Reaching and Grasping: Improved hand-eye coordination: Your baby starts visually tracking objects more intently. Hands coming together in front of their body. Batting at toys or hanging objects during play. These signals mean your baby is gearing up for purposeful interaction with the world. Encourage this vital stage with a variety of textures, shapes, and object placements. In photo: Rattle in the Bond With Me Play Box Tips to Encourage Reaching and Grasping: Place toys in a semi-circle around your baby—within view, but slightly out of reach. Offer both one-handed and two-handed toys. Include stationary objects and ones that roll or move, like balls. Provide toys with varying textures (e.g., soft balls, rattles, silicone teethers). Use treasure baskets filled with interesting, safe household items (wooden spoons, sponges, scarves, cotton wool, etc.). Hang toys from a play gym for visual engagement and batting practice. Allow mouthing—it's how babies explore and learn to hold. In photo: Floor Mirror in the Bond With Me Play Box Encouraging Voluntary Release (Before 12–18 Months): Begin by placing your hand under theirs when holding an object. Offer lightweight, easy-to-release toys. Model release by gently guiding their hand to drop the toy onto a soft surface. Praise your baby’s effort every step of the way. Helping Babies with Poor Grip or Grasping Challenges: Use textured toys to stimulate tactile engagement. Introduce toys that can be squeezed or have ridges. Physically guide their hands to grip and release objects. Encourage activities like splashing water or baby-led feeding to strengthen hand muscles. In photo: Montessori Knot Ball in the Sense With Me Play Box If Your Baby Isn’t Reaching or Grasping by 5 Months: Don’t panic! Increase tummy time to build core and upper body strength. Offer toys just beyond reach to encourage stretching and effort. If you’re concerned, consult your pediatrician to ensure development is on track. Reaching and grasping are the building blocks of independence and discovery. Start strong with MonkiBox. Our Montessori-inspired toys are thoughtfully designed to nurture every stage of your baby’s development.

Week 16: Your Baby’s Stages of Grasping Objects
Grasping is a key motor milestone that follows your baby’s growing confidence in reaching. Once grasping is mastered (typically by 9–10 months), brace yourself for the next stage—throwing! Here’s a breakdown of the stages of grasp development and when to expect them: 4 Months: Ulnar Palmar Grasp Your baby can hold an object placed in their hand, wrapping one or two fingers (usually the pinky and ring f inger) around it. The grip isn’t firm or controlled yet, and the thumb is not involved 5 Months: Palmar Grasp Now your baby has better control and wraps more fingers around the object, centering it in the palm. Still no thumb involvement, but there’s more strength and coordination. 6 Months: Radial Palmar Grasp Your baby begins using the thumb as a stabilizer while gripping an object. This is an early sign of refined control, although the thumb still doesn’t play an active role. 7 Months: Raking Grasp Your baby tries to grab objects using a raking motion with spread fingers. Once contact is made, the fingers close around the item. This grasp strengthens hand muscles and improves coordination. 8 Months: Radial Digital Grasp Here, your baby uses the pads of the thumb and fingers (excluding the forefinger) to lift objects. It’s a transition phase—a prelude to the pincer grasp. Thumb control continues to improve. 9 Months: Pincer Grasp This is a major fine motor milestone. Your baby uses the tips of the thumb and forefinger to pick up small items with precision, like beads or bits of food. The pincer grasp lays the foundation for self-feeding, buttoning, and writing later on. What is the Pincer Grasp, and How Is It Different? The pincer grasp allows babies to pick up small objects using only the tips of the thumb and forefinger. This is more precise than earlier grasps (like palmar or raking), which rely on the entire hand or the pads of the f ingers. How Does the Pincer Grasp Evolve from the Radial Digital Grasp? The radial digital grasp (seen around 8 months) uses the thumb and fingers, but lacks the fine control needed to isolate the thumb and forefinger. As hand-eye coordination and thumb control improve, babies refine their movements to achieve the precise, coordinated motion required for the pincer grasp. Want to support your baby’s grasp development? MonkiBox Montessori-inspired toys are designed to nurture every milestone with age-appropriate play tools and expert-backed guidance. Start the development journey with MonkiBox today!

Why Age-Appropriate Toys Matter for Child Development
Toys are your baby’s window to the world around them. They play a key role in developing motor, cognitive, emotional, and social skills. However, what many parents often miss is that it's not just any toy, but thoughtfully crafted, age-appropriate toys that truly stimulate early brain development, ignite creativity, promote critical thinking, and enhance cognitive abilities. The purpose of age-appropriate toys is to match the child’s current learning capacity and physical abilities, ensuring they are challenged—but never frustrated—or bored. Imagine handing a complex puzzle to a sixmonth-old or a simple sensory ball to a preschooler. Without alignment, toys lose their developmental value Why This Toy? – Understanding the Criteria for Toy Selection 1. Safety Comes First: - Newborns should not be given toys smaller than 3 cm in width and 6 cm in length to prevent choking hazards. - Battery-operated toys must have securely enclosed battery compartments. - Avoid toys with toxic materials, lead paint, sharp edges, or excessive noise. 2. Developmental Fit: - For a six-month-old, focus on sensory development with rattles, sensory mats, textured balls, and high-contrast image books or cards. - For toddlers, support emerging fine and gross motor skills, memory, and language development with treasure baskets, stickers, simple puzzles, and pouring cups 3. Engagement and Interests: - Choose toys that align with your child’s interests. Some children enjoy crafting, while others prefer dolls and open-ended pretend play. - According to child development specialists, toys should also provide opportunities for caregiver interaction. Dollhouses, kitchen sets, craft supplies, and blocks all encourage collaborative play and help refine social skills. How the Play Boxes by MonkiBox Support Development in Newborns (0–1 Month) Week 0: Cuddles and skin-to-skin contact are crucial for emotional and physical development. Holding your baby close regulates body temperature, heart rate, and breathing, while building a strong bond and emotional security. Week 1: Continued skin-to-skin contact supports breastfeeding, soothes your baby, and reduces stress hormones, promoting calmness and attachment. Week 2: Tummy time strengthens neck, shoulder, and arm muscles, laying the foundation for rolling and crawling. Start with short, supervised sessions, using soft mats and high-contrast cards from the Play Boxes by MonkiBox Week 3: Your baby’s vision is developing. High-contrast black-and-white toys and books stimulate visual focus and support brain growth. Week 4: To prevent flat head syndrome, incorporate varied positions and gentle head-turning during play. Tummy time and side-lying help develop a balanced head shape. Gentle rattles and crinkle toys in the Play Boxes by MonkiBox stimulate auditory senses and reflexive grasping. If your baby shows limited movement, has trouble lifting their head during tummy time, or does not respond to sounds, consult your pediatrician. In the meantime, make tummy time more engaging with the “Look With Me” Play Box by MonkiBox. How the Play Boxes by MonkiBox Support Development in 2–3-Month-Old Infants Week 5: Your baby is becoming more alert and begins to focus on faces and track slow-moving objects. High-contrast images stimulate visual development. Skin-to-skin contact and gentle play strengthen bonding. Week 6: Visual tracking improves, and your baby starts responding to voices and sounds. Talking, singing, and soft musical toys support auditory and emotional development. Rattles begin to connect sound and movement. Week 7: Eye tracking becomes more coordinated. Moving black-and-white cards side to side builds visual engagement. Daily tummy time supports strength and motor milestonesWeek 8: If tummy time is challenging, try alternatives like a rolled towel under the chest or placing toys just out of reach. These variations promote head lifting and arm strength. Week 9: Strengthening leg muscles early supports future milestones. Bicycle leg movements, supported standing, and kicking games develop coordination. Week 10: The first year is vital for brain growth. Sensory experiences, responsive interactions, and safe exploration form strong neural connections. Week 11: Support brain development with language play—talk, sing, and respond to your baby. Serve-and-return conversations build early communication skills. Week 12: Playtime stimulates movement, sensory development, and social engagement. Offer ageappropriate toys that spark curiosity and physical growth. If your baby doesn’t make eye contact by 3 months, consult a pediatrician. How the Play Boxes by MonkiBox Support Development in 3–4-Month-Old Babies Week 13: Take your baby on a house tour. Naming objects supports early language and cognitive recognition Week 14: Reaching and grasping build hand-eye coordination and fine motor control. Colorful, graspable toys are ideal. Week 15: Mirrors foster face recognition and promote self-awareness. Babies begin inspecting their hands with intention. Offer lightweight toys to encourage movement. Week 16: Grasping evolves from reflexive to voluntary. Offer toys that support manipulation and fine motor growth. Week 17: Engage in serve-and-return conversations. Responding to your baby’s sounds builds brain connections and language skills. Week 18: Pair tummy time with sensory toys to build strength and prepare for crawling. Textured mats, toys, and music enhance the experience. Week 19: Hand-to-hand transfer improves coordination and bilateral motor control. Encourage this by offering easy-to-hold toys. Week 20: Everyday interactions like face-to-face play and using mirrors support recognition and social development. Sensory-rich toys in the “Bond With Me” Play Box by MonkiBox enhance sight, sound, and touch. Top 10 No-Cost Toys for Infants, Toddlers, and Preschoolers Household items can be powerful tools for creative, developmental play. - Soft scarves: engage infants through sensory play and peekaboo, toddlers for dancing, and preschoolers for costumes. - Cardboard boxes: use them for crawling tunnels, cars, houses, forts, or puppet theaters. - Pots and wooden spoons: promote auditory stimulation and hand-eye coordination. - Plastic containers and lids: ideal for sensory bins, stacking, or matching. - Wallets and playing cards: build fine motor skills and imagination. - Measuring cups and spoons: support sensory exploration and basic math. - Other items: whisks, sponges, blankets, bottles (as shakers or pins), leaves, and stones—all enhance sensory and imaginative play. Always supervise play and ensure items are safe and clean. Why You Should Prioritize Your Child’s Play Routine A regular play routine is critical for healthy brain development, emotional regulation, and social skills. Research from Harvard’s Center on the Developing Child and the American Academy of Pediatrics shows that structured, age-appropriate play fosters resilience, strengthens parent-child bonds, and lays the foundation for lifelong learning. Play with Free Stuff: No Batteries Required! Children often prefer simple, everyday objects over flashy toys. Encourage creativity with household items like scarves, pots, or kitchen utensils. Go on nature hunts or create crafts from recycled materials. Openended play encourages social skills, imagination, and safe risk-taking. Conclusion Age-appropriate toys—especially everyday objects—play a vital role in every stage of your child’s development. Through meaningful, hands-on play, you nurture imagination, independence, and a love for learning. And remember, your presence, engagement, and time remain the most powerful tools in your child’s journey. For more play ideas and expert tips, visit the MonkiBox Community blog.

Week 5: Is It Better to Swaddle a Baby?
Your baby spent nine months in the womb, warm, snug, and gently rocked with every movement you made. After birth, that cozy space vanishes, replaced by a bright, open world. For many newborns, this dramatic change is overwhelming. That's why many parents turn to swaddling: to recreate that comforting sensation and help their baby adjust to life outside the womb. Swaddling can indeed improve sleep for some babies, especially in the early weeks. But not every baby needs it. Some infants naturally enjoy stretching out and exploring their newfound freedom. If your baby sleeps well without being swaddled, there’s no need to force it. The golden rule remains the same either way: always place your baby on their back to sleep If you choose to swaddle, here are a few essential tips to keep it safe and effective: 1. Get the Tightness Just Right A loose swaddle can unravel and pose a suffocation risk. - Ensure the wrap around the chest is snug enough to fit two to three fingers between the blanket and your baby's body. - The bottom should be loose enough to allow free leg movement; tight swaddling around the hips can lead to developmental issues. - Struggling? Consider a sleeping sack as an easy, safe alternative. 2. Know When to Swaddle According to the American Academy of Pediatrics, babies can be swaddled up to 12–20 hours per day, primarily during sleep. Avoid swaddling when your baby is awake and alert, as those moments are crucial for muscle development and motor skills. 3. Mind the Temperature Swaddling can lead to overheating. Warning signs include sweating, flushed cheeks, or rapid breathing. If the room temperature is comfortable (20–21°C or 68–72°F), dress your baby in a single layer more than you’re wearing 4. Follow Your Baby's Lead Babies can be unpredictable. If yours fusses or resists being swaddled, don’t force it. Try different methods or sleepwear until you find what works best. When Should You Stop Swaddling? Swaddling can soothe and comfort newborns, but it's not meant to last forever. Once your baby starts showing signs of rolling over, typically between 8 weeks and 4 months, it's time to stop. Continuing to swaddle at this stage increases the risk of suffocation. Always monitor your baby closely, and make space for them to roll and explore safely. With or without swaddling, your love and attention are what help them feel most secure Explore our expert-designed sleep and development tools at www.monkibox.com

Week 2: Why Is It Important to Schedule Tummy Time for Your Baby?
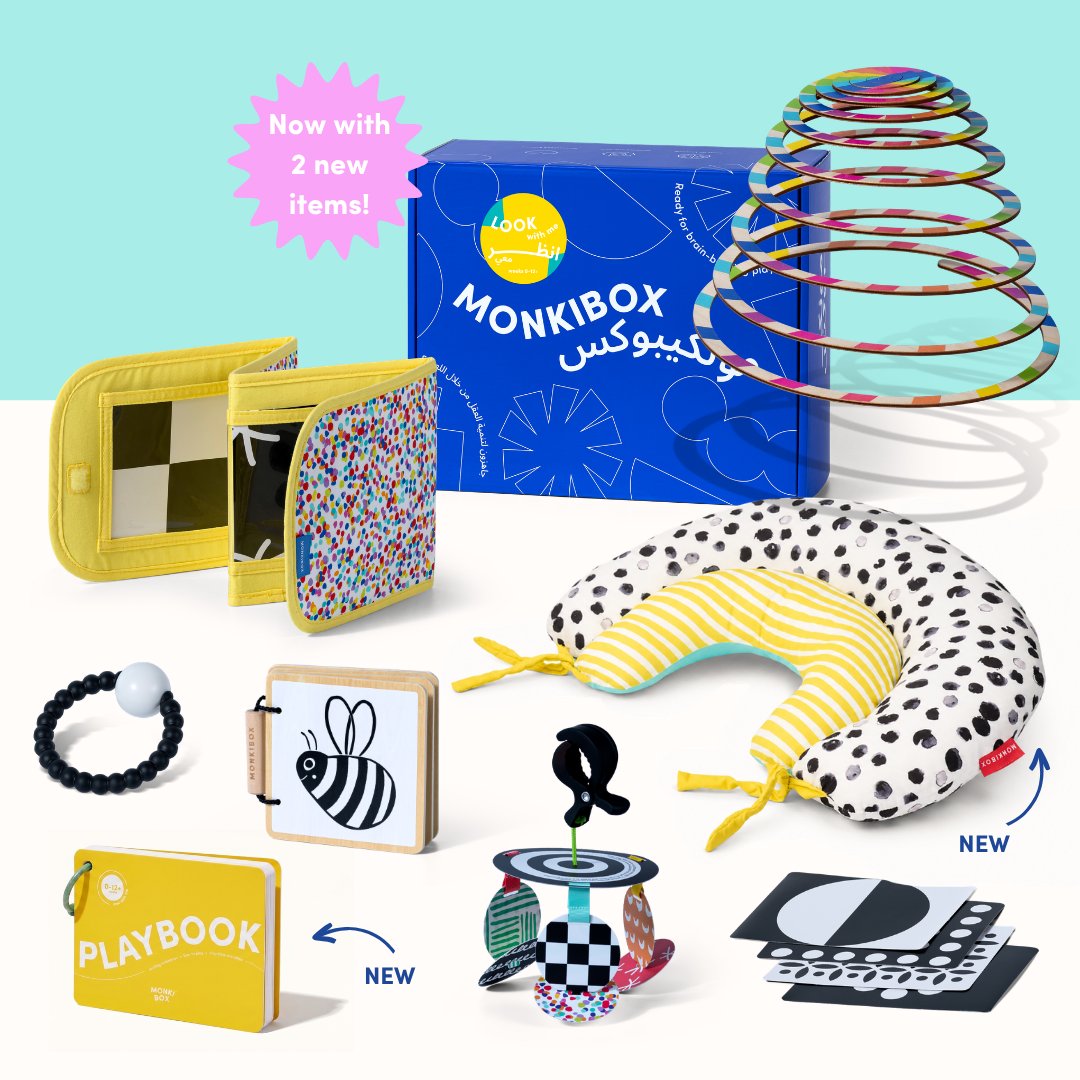
There are three essential questions every parent should ask: Is your baby sleeping well? Is your baby breastfeeding enough? Are you making time for tummy time each day? The American Academy of Pediatrics notes that while babies may prefer sleeping on their stomachs because it mimics the fetal position and reduces the Moro (startle) reflex, stomach sleeping is not safe for unsupervised rest. It increases the risk of Sudden Infant Death Syndrome (SIDS). Infants should always be placed on their backs to sleep until at least 12 months of age. In photo: Tummy Time Pillow & Wooden Book in the Look With Me Play Box However, supervised tummy time during awake hours is a vital part of early development. It builds the foundation for milestones like reaching, crawling, standing, and walking. Tummy time is essentially your baby's first workout and should begin from birth (after the umbilical cord falls off and the area heals). Research-backed benefits of tummy time include: - Strengthens neck, back, shoulder, and abdominal muscles. - Encourages motor skills like reaching, turning, and lifting limbs. - Supports gross motor development and prevents delays. - Helps prevent flat head syndrome (positional plagiocephaly) and torticollis (tight neck muscles). - Improves hand-eye coordination and environmental exploration. How to start tummy time: You can begin tummy time when your baby is around two weeks old. Start by placing them on your chest or lap for 30 seconds to one minute. Avoid tummy time immediately after feeding to reduce discomfort. Important safety note: While your baby may seem to enjoy lying on their stomach, do not let them sleep on their tummy. Even if they start rolling over at 4 or 5 months, it is still unsafe for sleep until they are at least 1 year old and can independently reposition themselves. Tips for tummy time success: - Lay your baby on a clean, firm surface like a play mat or blanket (never on pillows or beds). - Position their arms forward under the shoulders to help them push up. - Turn their head to the side to ensure they can breathe freely. - Use songs, toys, and your voice to make the experience enjoyable. - Try tummy time after diaper changes to help build the routine. It’s normal for babies to resist or show startle reflexes during early tummy time. These jerky movements are typical in the first 2–4 months and are linked to an immature nervous system. Stay consistent and positive. Daily tummy time while your baby is awake and alert lays the groundwork for healthy motor development. In photo: Tummy Time Pillow in the Look With Me Play Box Start the development journey with MonkiBox. Our Montessori-inspired toys are thoughtfully designed to support tummy time and every step of your baby’s growth.

Week 3: For Your Baby, It's All Black & White
Did you know that shortly after birth, your baby can detect shapes and edges, specifically where light meets dark? Luckily for new parents, their little one is naturally drawn to familiar faces. Since newborns can only see 15–30 cm ahead, your face is at the perfect distance for them to study and connect with. In photo: Wooden Book in the Look With Me Play Box In addition to face-to-face bonding, providing your baby with high-contrast black-and-white images can help exercise their eye muscles, improve focus, and increase attention span. Since their vision remains blurry and color perception is limited until around 3–4 months, experts recommend using simple black-and white visuals within 8 to 12 inches of their eyes. These images send stronger neural signals to the brain, which helps with tracking objects and developing overall visual strength Here are research-backed benefits of black-and-white images for your baby: - Stimulate underdeveloped optic nerves - Support healthy brain development without overstimulation - Improve visual focus and make tummy time more engaging - Encourage shape recognition, distance estimation, and gross motor coordination - Boost curiosity and memory by sending strong visual signals to the brain - Enhance hand-eye coordination through visual tracking When should you start? You can introduce high-contrast cards from day one. Color vision typically matures around the fourth or fifth month. Just be sure to hold images within their visual range—about the same distance as your face during feeding. Ways to incorporate visual stimulation into your routine: 1. Face-to-Face Play Looking into your baby’s eyes supports visual development. Try making funny faces—your baby will be drawn to features like your lips and eyebrows 2. Tummy Time It’s perfectly safe to place black-and-white cards in front of your baby during tummy time (1–5 minutes a day is great for newborns). As they grow stronger, these visuals can motivate them to lift their head and necks. 3. Crib or Changing Table Cards Hang black-and-white visuals on the wall near their crib or changing area. Alternate sides to help them practice looking both ways and prevent flat head syndrome 4. Bold Fashion Your baby in black-and-white mittens for short periods. High-contrast patterns promote hand discovery, which is key for hand control and fine motor skills. Your baby’s eyes are still learning to work together. Don’t worry if they occasionally appear cross-eyed—it’s completely normal. Pediatric experts suggest starting with basic shapes and curves in the first few months As your baby’s vision sharpens (around 2–3 months), you can introduce more complex patterns like checkerboards. If you notice any persistent or significant visual irregularities, consult your pediatrician. For a better understanding of how your baby sees, check out this helpful video demonstration. Try holding an image card and waiting until your baby looks away. When they look back, rotate the card to show the same image from a different angle. Repeat 2–3 times before switching to the next image. Start your baby’s developmental journey with MonkiBox. Our Montessori-inspired toys are carefully crafted to give your child the best start in life.

الدليل الشامل لمراحل نمو طفلك من MonkiBox
إن مشاهدة طفلكِ الصغير يكبر رحلةٌ ساحرة - من ابتسامته الأولى إلى خطواته الأولى، كل لحظةٍ فيه دهشةٌ خالصة. بعض المراحل العمرية تكون كبيرةً لا تُنسى، بينما تكون أخرى أكثر هدوءًا، مثل عندما يبدأ طفلكِ بالتمايل على أنغام الموسيقى أو تحريك الطعام بلسانه بمهارة. في مونكي بوكس، نحتفل بكل لحظة، لأن كل لحظةٍ منها تُمثل خطوةً في نمو طفلكِ المذهل ❤️ اكتشف كيف تم تصميم صناديق اللعب MonkiBox لرعاية كل مرحلة مهمة، عندما يكون طفلك مستعدًا لذلك. ما هي مراحل نمو الطفل؟ المعالم هي المهارات التي يكتسبها الأطفال عادةً خلال فترة زمنية محددة، مما يُوجه نموهم البدني والعقلي والاجتماعي والعاطفي. تنقسم هذه المعالم إلى أربعة مجالات رئيسية: المهارات الحركية (الحركات الكبرى والصغرى) التطور المعرفي (التفكير، الاستدلال، التعلم) اللغة والتواصل (الفهم والتعبير) النمو الاجتماعي والعاطفي (الاتصالات والعواطف والعلاقات) تذكر: مراحل النمو قابلة للتغيير. كل طفل فريد، والوقت المناسب يختلف من طفل لآخر. قد تظهر بعض المهارات مبكرًا، وبعضها متأخرًا، وقد يتم تجاهل بعضها تمامًا. هذا طبيعي تمامًا! كيف يتم قياس المعالم؟ التطور عبارة عن رقصة جميلة من الخطوات الصغيرة التي تؤدي إلى إنجازات كبيرة. على سبيل المثال: قبل المشي، يتعلم الأطفال سحب أنفسهم، والسير على الأثاث، والتوازن. تتداخل مراحل نمو الطفل. ابتسامة الطفل الأولى عاطفية ومهارة حركية! النمو مترابط، والنجاحات الصغيرة تُفضي إلى إنجازات كبيرة. هل يصل جميع الأطفال إلى مراحل نموهم المختلفة في نفس الوقت؟ الإجابة المختصرة: لا. لكل طفل إيقاعه الطبيعي الخاص. تُعطينا المراحل العمرية علاماتٍ مفيدة، ولكن هناك نطاق واسع من "الطبيعي". إذا شعرتَ يومًا بالشك، يُمكن لطبيب الأطفال مساعدتك. الدعم المُبكر فعّال عند الحاجة. الأطفال الخدج ومراحل نموهم إذا ولد طفلك مبكرًا (قبل 37 أسبوعًا)، فعادةً ما يتم قياس مراحل نموه من تاريخ ولادته المتوقع، وليس تاريخ ميلاده - وهو ما يسميه الأطباء "العمر المعدل". يلحق معظم الأطفال الخدج بالنمو الكامل في سن الثانية تقريبًا. مراحل نمو طفلك شهرًا بعد شهر لقد أعددنا نظرةً مُفصّلةً لما قد تراه مع نمو طفلك. تذكّر، هذه مجرد نطاقات - فبعض الأطفال يتقدمون بسرعة في مجالٍ ما ويأخذون وقتًا أطول في مجالٍ آخر. عمره شهر واحد المهارات الحركية يرفع رأسه لفترة وجيزة أثناء النوم على البطن يحرك الذراعين والساقين بحركات متقطعة يدير رأسه إلى الجانب عند الاستلقاء التطور المعرفي يحدق في الأنماط المتناقضة أو الألوان الجريئة يهدأ عندما يطمئن بصوت مألوف اللغة والتواصل يصدر صرخات بسيطة بسبب الجوع أو الانزعاج أو التعب يبدأ في إصدار أصوات "الراحة" الاجتماعية والعاطفية يقوم بإنشاء اتصال بصري مؤقتًا يستجيب للاحتضان أو الهز عمره شهرين المهارات الحركية يحافظ على ثبات الرأس عند رفعه يدفع لأعلى قليلاً أثناء وقت البطن يتبع الأشياء المتحركة بعينيه التطور المعرفي يتعرف على الأشخاص المألوفين عن بعد يبدأ في توقع الروتينات (الرضاعة، تغيير الحفاضات) اللغة والتواصل الهديل والغرغرة يبتسم عمدًا استجابةً للتفاعل الاجتماعية والعاطفية يظهر الإثارة عند رؤية مقدمي الرعاية يستمتع بالتحدث إليه والابتسام له عمره 3 أشهر المهارات الحركية يفتح يديه أكثر يرفع الصدر والرأس مع دعم الذراع يبدأ بضرب الألعاب التطور المعرفي يراقب الوجوه باهتمام يلاحظ يديه ويبدأ في الاستكشاف اللغة والتواصل يضحك بصوت عالي يتحدث بشكل أكثر تعبيرا الاجتماعية والعاطفية يبتسم عند انعكاسه في المرآة يبدأ في التعرف على الأصوات المألوفة عمره 4 أشهر المهارات الحركية يتدحرج من البطن إلى الظهر يصل إلى الألعاب ويمسكها يضع يديه في فمه التطور المعرفي يلاحظ السبب والنتيجة (هز خشخيشة = ضوضاء) يبحث عن مصادر الأصوات اللغة والتواصل ثرثرة بنغمات مختلفة يقلد بعض تعابير الوجه الاجتماعية والعاطفية يظهر السرور من خلال الابتسامات والضحكات يستمتع بالتفاعلات المرحة عمره 5 أشهر المهارات الحركية يتدحرج من الظهر إلى البطن يدفع لأعلى بذراعين ممدودتين يجلب القدمين إلى الفم التطور المعرفي يستكشف الأشياء باليدين والفم يتعرف على الوجوه المألوفة مقابل الغرباء اللغة والتواصل يبدأ في التعبير عن الإثارة بصوت عالٍ يتفاعل مع الأصوات بالحركات الاجتماعية والعاطفية يظهر تفضيله لمقدمي الرعاية الأساسيين يستمتع باللعب بالمرآة 6 أشهر المهارات الحركية يجلس مع الدعم الصخور ذهابا وإيابا على اليدين والركبتين ينقل الأشياء بين اليدين التطور المعرفي يفهم بدايات ثبات الأشياء يظهر فضولًا بشأن المناطق المحيطة اللغة والتواصل يستجيب لاسمه الخاص يبدأ "التحدث" أثناء اللعب الاجتماعية والعاطفية يتعرف على اسمه الخاص يظهر الفرح في الألعاب الاجتماعية مثل لعبة الغميضة 7-8 أشهر المهارات الحركية يجلس بدون دعم يبدأ بالزحف أو الانزلاق يمسك بالأشياء الأصغر باستخدام حركة "التمشيط" التطور المعرفي يستكشف الألعاب باليدين والفم يبحث عن الأشياء المخفية اللغة والتواصل ثرثرة سلاسل من الأصوات ("با-با-با") يستجيب للإشارات اللفظية البسيطة الاجتماعية والعاطفية يطور قلق الغرباء يصبح أكثر تفاعلية أثناء اللعب من عمر 9 إلى 10 أشهر المهارات الحركية يسحب للوقوف رحلات بحرية على طول الأثاث يشير بإصبع السبابة التطور المعرفي يشارك في حل المشكلات البسيطة يتبع الإيماءات الأساسية مثل الإشارة اللغة والتواصل يفهم عبارات بسيطة مثل "تعال هنا" يقلد الأصوات والأفعال الاجتماعية والعاطفية يظهر تفضيله لأشخاص وألعاب معينة يستمتع بالألعاب التفاعلية مثل لعبة بات-أ-كيك 11-12 شهرًا المهارات الحركية يقف بمفرده لفترات قصيرة يتخذ خطواته المستقلة الأولى يلتقط الأشياء الصغيرة بالإبهام والإصبع (قبضة الملقط) التطور المعرفي حدود الاختبارات وردود الأفعال (السبب والنتيجة) يبدأ اللعب التظاهري البسيط (إطعام الدمية، تمشيط الشعر) اللغة والتواصل يقول "ماما" أو "دادا" بمعنى يستخدم إيماءات بسيطة مثل التلويح "وداعًا" الاجتماعية والعاطفية يظهر تفضيله لأشخاص وألعاب معينة يستمتع بالألعاب التفاعلية مثل لعبة بات-أ-كيك 11-12 شهرًا المهارات الحركية يقف بمفرده لفترات قصيرة يتخذ خطواته المستقلة الأولى يلتقط الأشياء الصغيرة بالإبهام والإصبع (قبضة الملقط) التطور المعرفي حدود الاختبارات وردود الأفعال (السبب والنتيجة) يبدأ اللعب التظاهري البسيط (إطعام الدمية، تمشيط الشعر) اللغة والتواصل يقول "ماما" أو "دادا" بمعنى يستخدم إيماءات بسيطة مثل التلويح "وداعًا" الاجتماعية والعاطفية يعرض التعلق بمقدمي الرعاية يسعى للحصول على الراحة من البالغين المألوفين عندما ينزعج تم تصميم صناديق اللعب MonkiBox بواسطة خبراء تنمية الطفل لإثارة الفرح ودعم نمو طفلك في كل مرحلة سحرية. ✨ امنح طفلك بداية رائعة. استكشف صناديق اللعب لدينا اليوم.